

Timer
00:00
Answers
A
B
C
D
E
Stats
Difficulty—
Hello - I was curious if someone could help better explain DS # 117 in the 12th Edition of the OG. I understand the logic, but I have read to NEVER trust diagrams provided on the test for Data Sufficiency portion, so whenever I am provided one, I always try to think of a way to disprove it. Can someone help me identify the flaw in my logic below? Thanks!
"117. In the figure above, points A, B, C, D, and E lie on the line. A is on both circles, B is the center of the smaller circle, C is the center of the larger circle, D is on the smaller circle, and E is on the larger circle. What is the area of the region inside the larger circle and outside the smaller circle?
(1) AB = 3 and BC = 2
(2) CD = 1 and DE = 4"
My first thought was "they only say point D lies on the small circle, it does not mention where within the larger circle it lies". So I instantly drew the alternative sketch provided below, with the point D WITHIN radius AC. So here goes the math portion:
Statement 1 does not address point D. Since AB = 3 we know the radius of the small circle, r, is 3, so area(small) = 9pi. Since AB + BC = 3 + 2 = 5, we know the radius of the large circle, R, is 5, so area(big) = 25pi. Difference equals 25pi - 9pi = 14pi. SUFFICIENT.
Statement 2 does address point D, so I would think you could come up with different answers, no? First, let's assume the GMAT's provided drawing is accurate. Since CD + DE = 4 + 1 = 5, the radius of the big circle, R, we know area(big) = 25pi. Thus, diameter of the big circle, D, is 10, then the small diameter, d, can be solved using AD + DE = 10, so AD = d = 6, so small radius, AB, r = 3, so we know area(small) = 9pi. Difference equals 25pi - 9pi = 14pi. BUT, what about the alternative, where D is inside radius AC? Then we know that DE - CD = radius of the big circle, R = 4 - 1 = 3. Thus, the diameter of the small circle, AD, d = AC - CD = R - 1 = 3 - 1 = 2. Thus, the radius of the small circle, r = 1. Then the difference equals 9pi - pi = 8pi. If my logic is correct, then 2 different values can solve the equation with statement 2 remaining true, so this statement should be INSUFFICIENT, no?
So the answer should be A? The official answer provided is D, that each is sufficient alone. Any thoughts? Is my logic on the second version flawed? There is nothing in the statement that says where point D has to be, just "on the smaller circle".
Thanks!
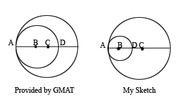
"117. In the figure above, points A, B, C, D, and E lie on the line. A is on both circles, B is the center of the smaller circle, C is the center of the larger circle, D is on the smaller circle, and E is on the larger circle. What is the area of the region inside the larger circle and outside the smaller circle?
(1) AB = 3 and BC = 2
(2) CD = 1 and DE = 4"
My first thought was "they only say point D lies on the small circle, it does not mention where within the larger circle it lies". So I instantly drew the alternative sketch provided below, with the point D WITHIN radius AC. So here goes the math portion:
Statement 1 does not address point D. Since AB = 3 we know the radius of the small circle, r, is 3, so area(small) = 9pi. Since AB + BC = 3 + 2 = 5, we know the radius of the large circle, R, is 5, so area(big) = 25pi. Difference equals 25pi - 9pi = 14pi. SUFFICIENT.
Statement 2 does address point D, so I would think you could come up with different answers, no? First, let's assume the GMAT's provided drawing is accurate. Since CD + DE = 4 + 1 = 5, the radius of the big circle, R, we know area(big) = 25pi. Thus, diameter of the big circle, D, is 10, then the small diameter, d, can be solved using AD + DE = 10, so AD = d = 6, so small radius, AB, r = 3, so we know area(small) = 9pi. Difference equals 25pi - 9pi = 14pi. BUT, what about the alternative, where D is inside radius AC? Then we know that DE - CD = radius of the big circle, R = 4 - 1 = 3. Thus, the diameter of the small circle, AD, d = AC - CD = R - 1 = 3 - 1 = 2. Thus, the radius of the small circle, r = 1. Then the difference equals 9pi - pi = 8pi. If my logic is correct, then 2 different values can solve the equation with statement 2 remaining true, so this statement should be INSUFFICIENT, no?
So the answer should be A? The official answer provided is D, that each is sufficient alone. Any thoughts? Is my logic on the second version flawed? There is nothing in the statement that says where point D has to be, just "on the smaller circle".
Thanks!